How to your use table Saw : the ultimate woodworking guide

Introduction: ultimate woodworking guide

When it comes to woodworking, nothing rivals the versatility and importance of a table saw. A true game-changer in any craftsman’s toolkit, whether you’re a woodworking pro or an eager DIYer. Mastering the art of using a table saw is the key to unlocking impeccable, precise cuts. In this comprehensive guide, we’ll delve into the core of table saw mastery. From essential safety measures to expert-level techniques, we’ve got you covered. Elevate your skills and projects with maintenance tips, insights into basic and advanced methods, and more. Join us as we embark on a journey to harness the full potential of this woodworking essential. Your projects deserve nothing less than the precision and excellence that a table saw brings.

Understanding the Table Saw

2.1 What is a Table Saw?

A table saw is a woodworking device that features a circular saw blade affixed to a spindle and powered by an electric motor. The blade extends above the surface of a flat and robust table, enabling craftsmen to execute precise and consistent cuts for a variety of woodworking tasks. To find how to get the perfect table saw for your needs, check out my guide 

Woodworking

2.2 Types of Table Saws

When it comes to table saws, the market offers a diverse range, each tailored to cater to distinct woodworking requirements. Four primary categories stand out: Contractor, Cabinet, Hybrid, and Portable Table Saws. Delve into the features of each to pinpoint the perfect tool that aligns with your individual preferences and project demands.

Contractor Saws: These workhorses are prized for their mobility and versatility. Ideal for jobs that require moving around, they’re equipped with powerful motors and ample cutting capacity. From on-site projects to workshop tasks, contractor saws are your reliable companions.

Cabinet Saws: If precision and durability top your list, cabinet saws deliver. Their robust build minimizes vibrations, while advanced fence systems ensure accuracy. Whether you’re crafting intricate furniture or engaging in professional woodworking, cabinet saws provide the stability and performance you need.

Hybrid Saws: Bridging the gap between contractor and cabinet saws, hybrids amalgamate the best of both worlds. With enhanced power and improved features, they’re a popular choice for woodworking enthusiasts seeking high-quality output without the bulk of a full cabinet saw.

Portable table Saws: When mobility is non-negotiable, these compact companions shine. Designed for easy transport, they’re perfect for remote locations. Don’t underestimate their size – they pack a punch and are tailored for jobs where maneuverability reigns supreme.

2.3 Table Saw Components

Before delving into its usage, it’s crucial to become familiar with key elements such as the table surface, rip fence, miter gauge, blade guard, riving knife, and power switch. The table surface serves as the foundation for workpieces, providing stability during cutting. The rip fence acts as a guide, ensuring accurate alignment for straight cuts. The miter gauge facilitates precise angle adjustments for bevels and miters. Safety features include the blade guard, which shields against contact with the blade, and the riving knife, preventing binding and kickback. Lastly, the power switch initiates saw operation and should be readily accessible for control. By understanding these components, users can create a secure and controlled environment while achieving accurate and intricate cuts with the table saw.

Woodworking

3.1 Read the Manual

Before using any tool, including a table saw, it’s essential to thoroughly read the manufacturer’s manual. This manual provides vital information about the tool’s specifications, safety guidelines, and maintenance recommendations. Understanding these details is crucial to prevent accidents and ensure safe usage.

3.2 Wear Safety Gear

When handling a table saw, prioritize safety above all else. Proper safety gear is your armor against potential dangers. Equip yourself with safety glasses, ear protection, and suitable clothing to create a barrier against hazards. Think of it as a personal defense system.

Your eyes are sensitive like a delicate treasure and require safeguarding. Safety glasses are your shield, offering protection from debris and splinters. Likewise, your ears deserve consideration. The loud noise from the table saw is like an unexpected assault. Ear protection acts as your guardian, preserving your hearing.

Let’s not overlook clothing. View it as your frontline protection. Wear appropriate attire and you’ll establish a safeguard against flying particles and potential scrapes. Remember, safety gear is your loyal companion, ensuring you’re fortified against unforeseen threats.

Consider this scenario: you’re embarking on a woodworking adventure with your table saw as your trusty companion. In this tale, safety gear becomes your sidekick, shielding you from surprise attacks in the form of flying wood chips. With your safety glasses, ear protection, and proper clothing, you’re impervious.

Patience is key. Safety is a journey, not a race. Similar to reading a book thoroughly, don’t skip any steps. Take the time to adhere to safety rules, just as you would navigate through chapters. It’s like a map guiding you toward woodworking success.

3.3 Maintain a Clean Workspace

woodworking

Maintaining a tidy workspace is crucial, particularly when using a table saw. A cluttered area can lead to accidents and compromise the cutting process. To ensure safety and efficiency, follow these guidelines:

Clear Surface: Remove unnecessary items from the work area before cutting.

Organized Storage: Designate storage areas for tools and materials to prevent clutter.

Adequate Space: Maintain enough room around the table saw for easy movement.

Open Pathways: Keep pathways to and from the saw clear to avoid tripping hazards.

Zoned Setup: Establish separate zones for different tasks to prevent overcrowding.

Regular Cleaning: Clean up debris and dust after each use to sustain an organized space.

Tool Storage: Store tools properly when not in use, preventing clutter on work surfaces.

By adhering to these practices, you create a safer and more productive environment for operating a table saw.

3.4 Avoid Kickbacks

Kickbacks are unexpected table saw mishaps, which can be easily prevented. To avoid them, use a splitter or riving knife, set the blade height correctly, and stand to the side while cutting. These measures will keep you safe from surprises and ensure a smooth woodworking experience.

Setting Up the Table Saw

Woodworking

4.1 Choosing the Right Location

Choose a well-lit, ventilated area for your table saw, providing enough space for your materials. Ensure a level, sturdy surface to work on. Maintain a comfortable temperature. Ready to start crafting!

4.2 Assembling the Table Saw

Follow the manufacturer’s instructions carefully to assemble the table saw correctly. Make sure to thoroughly check all connections and tighten all bolts to ensure the stability of the machine. Your attention to detail during assembly is crucial for a safe and effective tool.

4.3 Adjusting the Blade and Fence

To ensure precise cuts, make sure to adjust the blade height and angle accurately. Don’t forget about the rip fence position too – it’s crucial for accuracy. Employ proper measuring tools to achieve the desired results. These tools are your allies in getting the job done right.

Basic Table Saw Techniques

Woodworking

5.1 Crosscuts

Crosscutting is a technique where cuts are made across the wood’s grain, perpendicular to its natural fibers. This results in precise divisions of the wood. For accurate crosscuts, using a miter gauge or a sled is recommended. These tools guide the wood during cutting, ensuring precision in the final cuts. It’s important to keep the wood grain aligned perpendicular to the cut direction to maintain structural integrity and prevent deviations. By following this principle and using appropriate tools, anyone can enhance their proficiency in crosscutting, achieving clean and precise cuts in their woodworking projects.

5.2 Rip Cuts

Rip cuts involve slicing through wood parallel to its grain. To make these cuts, you’ll use a tool called a rip fence. This device guides the wood along the blade, ensuring your cuts are straight and consistent. Think of it like a helpful friend showing you the way on a journey. So, with rip cuts and a rip fence, you’ll get smooth, precise cuts in your woodworking projects. It’s like having a secret recipe for success in your toolbox!

5.3 Miter Cuts

Miter cuts are a woodworking technique involving angled cuts made at the edge of a workpiece, such as a piece of wood. These cuts are used to create joints that fit together seamlessly at various angles. To achieve accurate miter cuts, a tool called a miter gauge is employed. The miter gauge allows you to set the desired angle with precision. By aligning the workpiece with the miter gauge and adjusting the angle accordingly, you can make cuts that are tailored to your specific project requirements. This technique is commonly used in tasks like creating frames, molding, and corners for furniture. Advanced Table Saw Techniques.

6.1 Dado Cuts

Dado cuts involve making wide grooves in a workpiece using a dado blade and insert for precision. These cuts provide stability and form a strong foundation for woodworking projects. By employing the specialized blade and insert, craftsmen achieve meticulous grooves that enhance the overall quality of their work.

6.2 Bevel Cuts

Bevel cuts are angled slices through the workpiece. To achieve the desired bevel angle, adjust the blade’s angle accordingly. Just like finding the right angle for a high-five, precision is key. Think of it as giving your workpiece a distinct look. The blade’s angle is the secret ingredient, like seasoning in a recipe. Your tool is your partner, helping you navigate the cut. So, remember adjust the angle for a standout performance in woodworking.

6.3 Rabbet Cuts

Rabbet cuts are a woodworking method that involves making recessed grooves along a workpiece’s edge. These grooves, or cuts, can be created using a specialized dado blade or by making multiple passes with a regular saw blade. Rabbet cuts serve both practical and aesthetic purposes, allowing for secure joints between wood pieces while also adding visual depth and interest to the finished project.

Table Saw Maintenance

Woodworking

7.1 Cleaning and Lubricating

Make sure to regularly clean your table saw to remove dust and debris that can impact its performance. Also, follow the manufacturer’s recommendations for lubricating moving parts. This will help keep your table saw working smoothly and efficiently.

7.2 Blade Maintenance

Ensure your saw blade remains clean and sharp. Regularly inspect the blade for any signs of damage or wear and replace it when necessary to maintain its effectiveness.

7.3 Aligning the Table Saw

Ensuring the accuracy of your table saw is essential to achieve flawless cuts. Regular inspections are important to keep everything in order. The blade, fence, and miter gauge are especially significant components that must be monitored. Similar to how a chef refines a recipe to make it just right, you should make adjustments to these components. Aligning them properly is key to achieving cuts that truly stand out in terms of quality.

Troubleshooting Common Issues

Woodworking

8.1 Burning Wood

When burning occurs while cutting wood, it can be due to various factors, such as a dull blade or feeding the material too slowly. Identifying the root cause and making necessary adjustments is crucial to prevent this issue. So, tighten those screws, grease those gears, and get ready to make those cuts like a champ. No more burning’, no more fuss – just clean, crisp cuts like a hot knife through butter.

8.2 Uneven Cuts

Irregular cuts can stem from a blade that lacks balance, inaccurate fence alignment, or a misaligned miter gauge. To attain uniform and polished cuts, it’s crucial to inspect and rectify these components accordingly.

8.3 Saw Blade Wobbling

Inspect the arbor and blade for any potential damage, as a wobbling saw blade can result in imprecise cuts and pose a risk of accidents. Should you identify any signs of damage or irregularities, it is imperative to replace the faulty components promptly. 

Woodworking

Upgrading Your Table Saw

9.1 Upgrading the Fence

The advantages of upgrading table saw fence are substantial. Enhanced cutting accuracy and safety are the primary benefits, leading to an overall improvement in your project outcomes. By upgrading, you’re ensuring smoother, more precise cuts with better alignment. Additionally, this upgrade can play a crucial role in accident prevention, providing greater control during the cutting process. This decision is more than just an enhancement; it represents an investment in the quality and safety of your woodworking projects. If your goal is to achieve superior results and a more secure working environment, then upgrading your table saw fence should undoubtedly be on your radar.

9.2 Adding Safety Features

Boost your table saw’s safety with essential add-ons. Attach a blade guard, anti-kickback pawls, and a push stick. These accessories act as safeguards, preventing accidents and enhancing your woodworking experience. The blade guard shields your hands from the blade, the anti-kickback pawls prevent wood from recoiling, and the push stick helps you guide materials without risking your fingers. Make safety a priority and enjoy woodworking with confidence.

Table Saw Accessories

10.1 Push Sticks

Push sticks are vital safety tools used in woodworking. They keep hands away from the blade while guiding the workpiece. By acting as a buffer, push sticks prevent direct contact with the sharp blade, reducing the risk of accidents. These tools come in various sizes and designs, all with the same purpose: to maintain a safe distance between hands and the blade. Incorporating push sticks into woodworking practices enhances both precision and safety, allowing artisans to work confidently and efficiently.

10.2 Featherboards

Featherboards are essential for safe woodworking. They apply pressure to workpieces, guiding them securely through cutting blades. This maintains stability, preventing accidents. Adjustable and adaptable to various tasks, they also prevent kickback – forceful material projection. In short, featherboards ensure precise, secure, and safe woodworking.

10.3 Outfeed Tables

Outfeed tables are essential supports for large workpieces during cutting tasks. They prevent potential accidents by providing a stable platform, ensuring workpieces stay in place. These tables enhance both safety and efficiency, allowing you to focus on accurate cuts. In summary, outfeed tables are indispensable tools that contribute to a secure and productive workspace.

Tips for Efficient Table Saw Use

Woodworking

11.1 Marking and Measuring

Precise cuts hinge on accurate marking and measuring. Employ a combination square alongside other measuring tools to ensure proper marking of your workpiece.

11.2 Creating Jigs

Jigs are vital tools for achieving consistent cuts in woodworking. Take the time to create jigs tailored to your needs. These tools ensure precise results and are worth the initial investment.

11.3 Using Hold-Downs

Hold-downs are essential tools that ensure the stability of your workpiece during cutting tasks. By preventing kickbacks and maintaining a secure grip, they contribute to both safety and precision. These devices anchor the workpiece in place, enabling accurate cuts without the risk of sudden movements. Incorporating hold-downs into your workflow enhances both the quality of your work and the overall safety of the cutting process.

Conclusion

This woodworking wonder opens doors to endless project possibilities. From mastering its parts and safety rules to mastering cutting techniques, you’ll be slicing and dicing like a pro. Keep safety front and centre, gear up right, and keep that saw in top shape for primo performance. Now armed with table saw knowledge, let your inner craftsman run wild and create woodworking wonders that’ll blow minds!

Woodworking

Frequently Asked Questions (FAQs)

 *Is a table saw suitable for beginners? -Yes, but beginners should take the time to learn the tool’s basics and safety measures before using a table saw.

*What type of blade should I use? -The type of blade you need depends on the material and the type of cuts you plan to make. Combination blades are versatile and suitable for most applications.

*Can I use a table saw to cut metal? -While some table saws can cut non-ferrous metals, it’s generally better to use a dedicated metal-cutting saw for optimal results.

* How often should I clean my table saw? -Regular cleaning is essential to maintain the saw’s performance. Clean it after every use and perform a thorough cleaning at least once a month.

*Can I use a dado blade on any table saw? -Not all table saws can accommodate dado blades. Check your table saw’s specifications to determine if it supports dado blades.

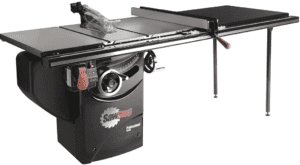
*What are the basic components of a table saw? -A table saw consists of a flat table surface, a circular saw blade mounted on an arbor, a rip fence for guiding cuts, a miter gauge for angled cuts, and safety features like a blade guard and riving knife.

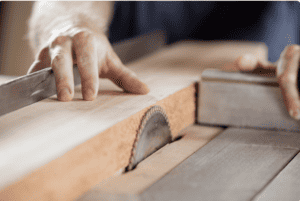
*How can I prevent kickbacks while using a table saw?To prevent kickbacks, use a splitter or riving knife to keep the workpiece from pinching the blade, avoid standing directly behind the workpiece, and maintain proper blade height.

*Can I use a table saw for other materials besides wood? -While some table saws can cut non-ferrous metals, it’s generally not recommended. Table saws are primarily designed for woodworking tasks.

*What safety gear is essential when using a table saw? -Essential safety gear includes safety glasses, ear protection, and appropriate clothing that covers your arms and legs. It’s also advisable to wear a dust mask to protect yourself from sawdust.

*How often should I replace my table saw blade? -The frequency of blade replacement depends on usage and the type of materials you cut. Inspect the blade regularly for signs of wear and damage and replace it when necessary.